
How To Make Your Own Polymer Clay Earrings: A Step-By-Step Guide
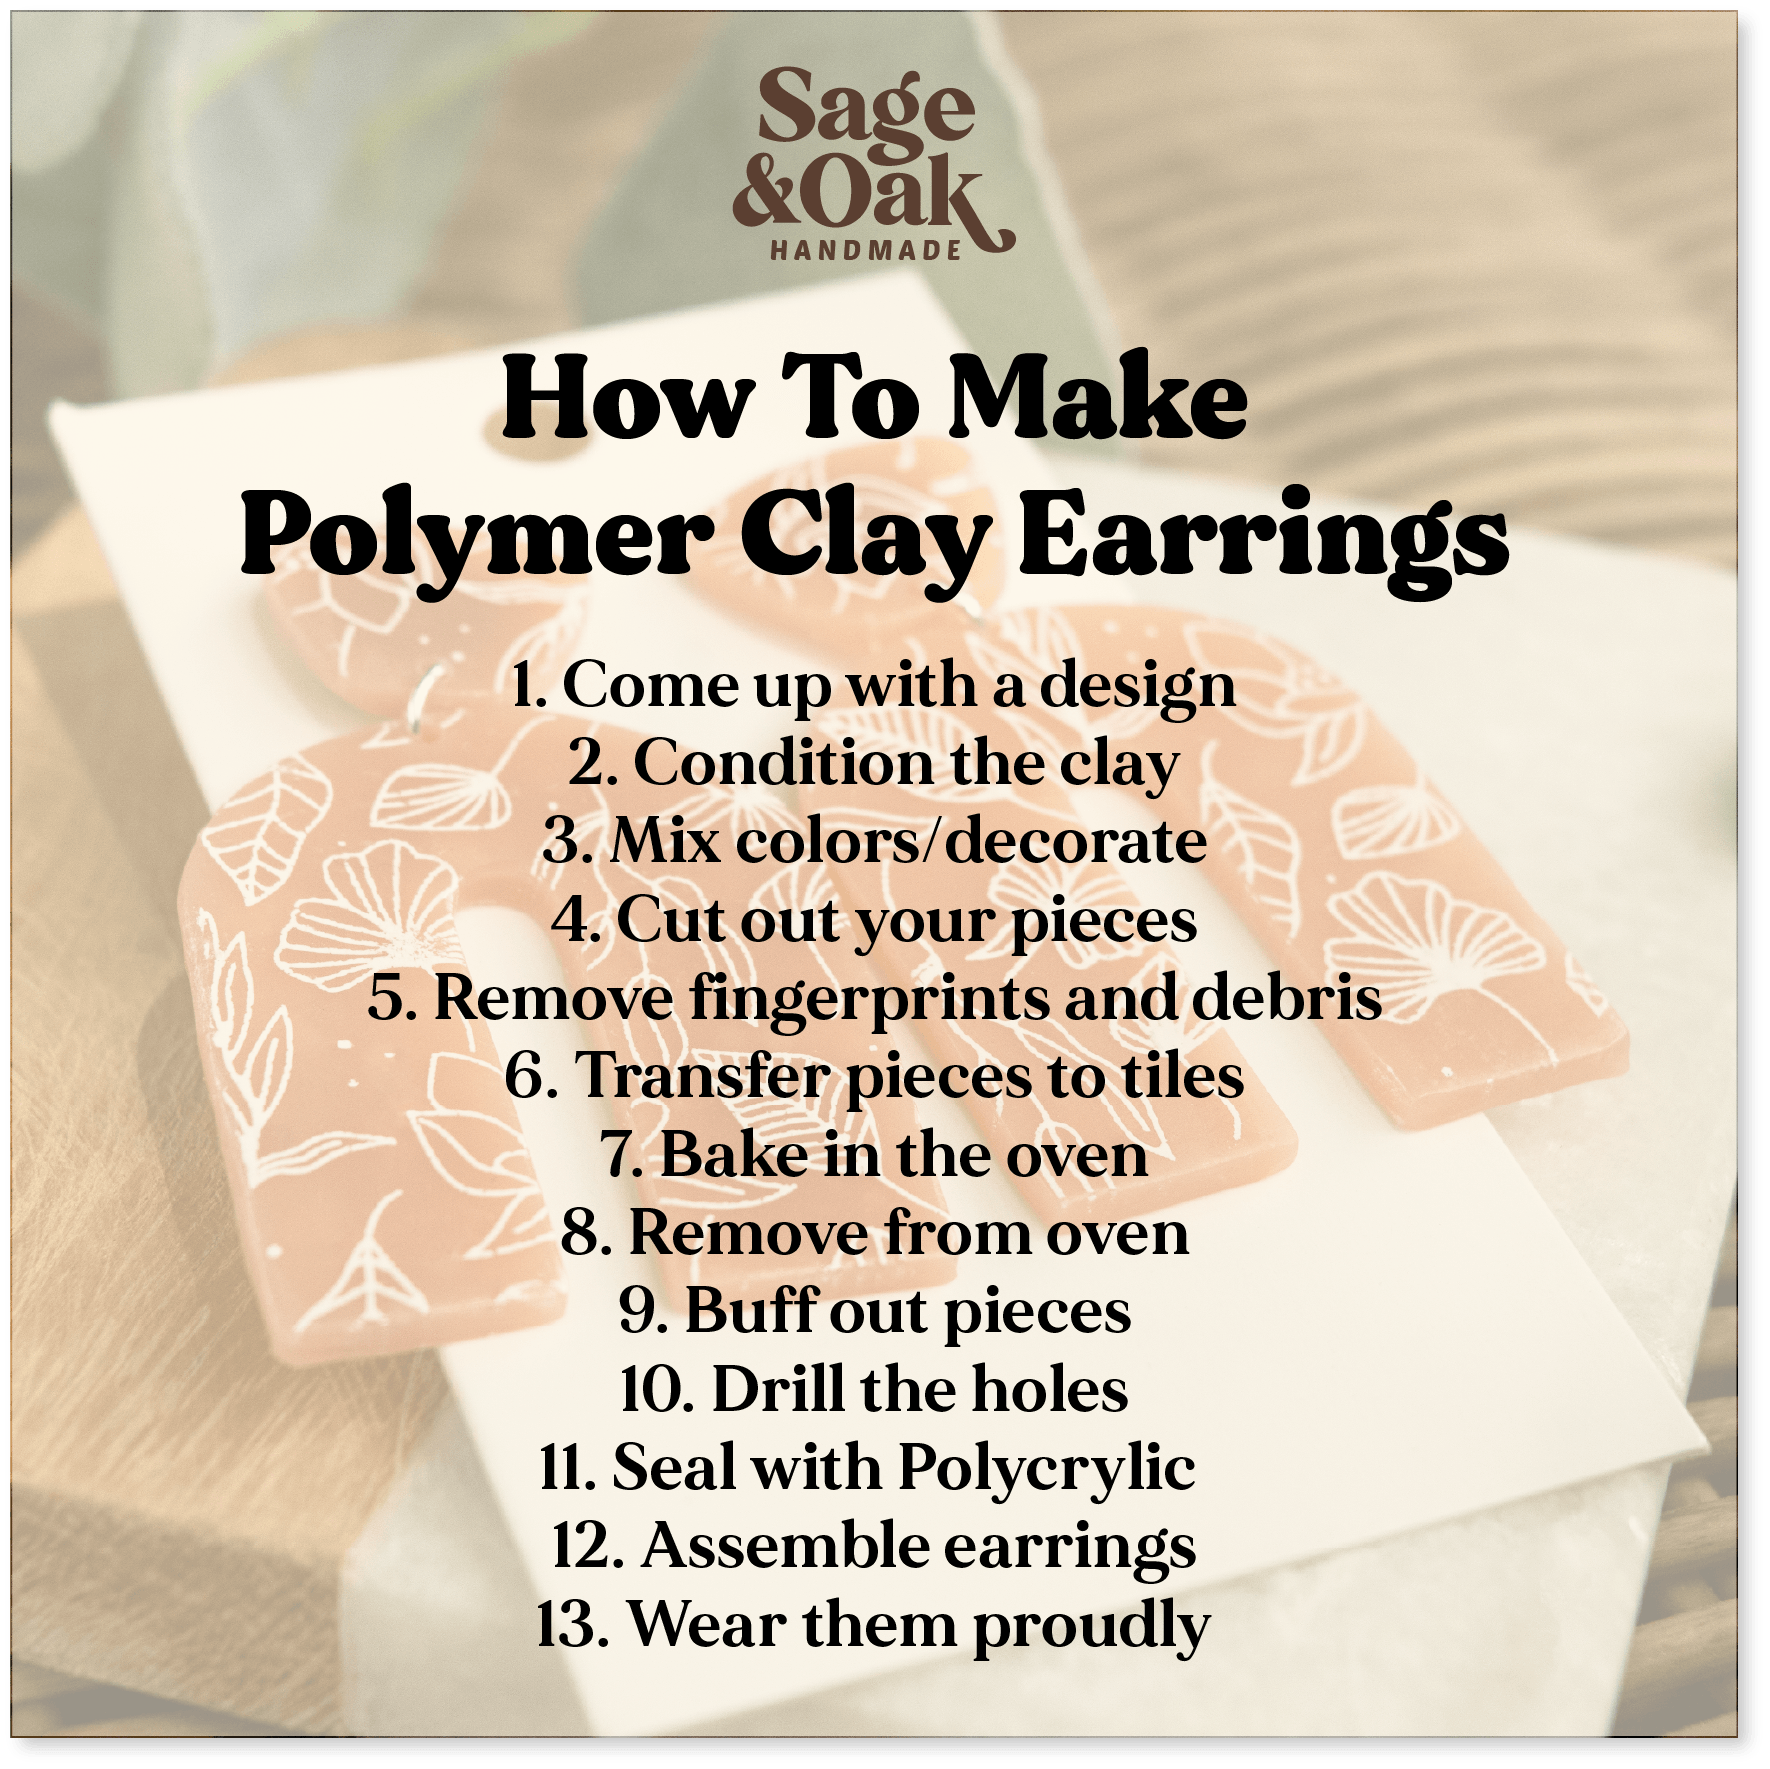
Polymer clay earrings have become super popular lately and we love seeing all of the creativity in the artist community. We get asked from time to time how we make our polymer clay earrings and we thought a walkthrough guide would be super helpful! Please remember that we are by no means professionals and we will be using our own experiences for this tutorial.
You Will Need:
Pencil and paper (Optional)
Polymer clay (colors, amount, brand, all up to you)
Acrylic roller
Pasta machine (Optional)
Clay cutters (mini cookie cutters essentially)
Clay knife
Small bowl of water (Optional)
Cornstarch (Optional)
Alcohol (Optional)
Cotton swabs (Optional)
Earring hardware
Baking sheet
Large tile surface (Optional, but recommended)
Small tiles for baking (Optional, but recommended)
Dremel/buffer (Optional)
Drill
Polycrylic (Optional)
Rubber gloves (Optional)
Let’s Design
Before we even get out our clay materials, we sit down and figure out what we’re going to make. We grab a piece of paper to design the shape and color style of a pair of earrings so we know exactly what we need to do. This saves us time and confusion in the end.
You don’t technically have to come up with a plan or design, you can just dive right in and let your creativity take lead!
Condition the Clay
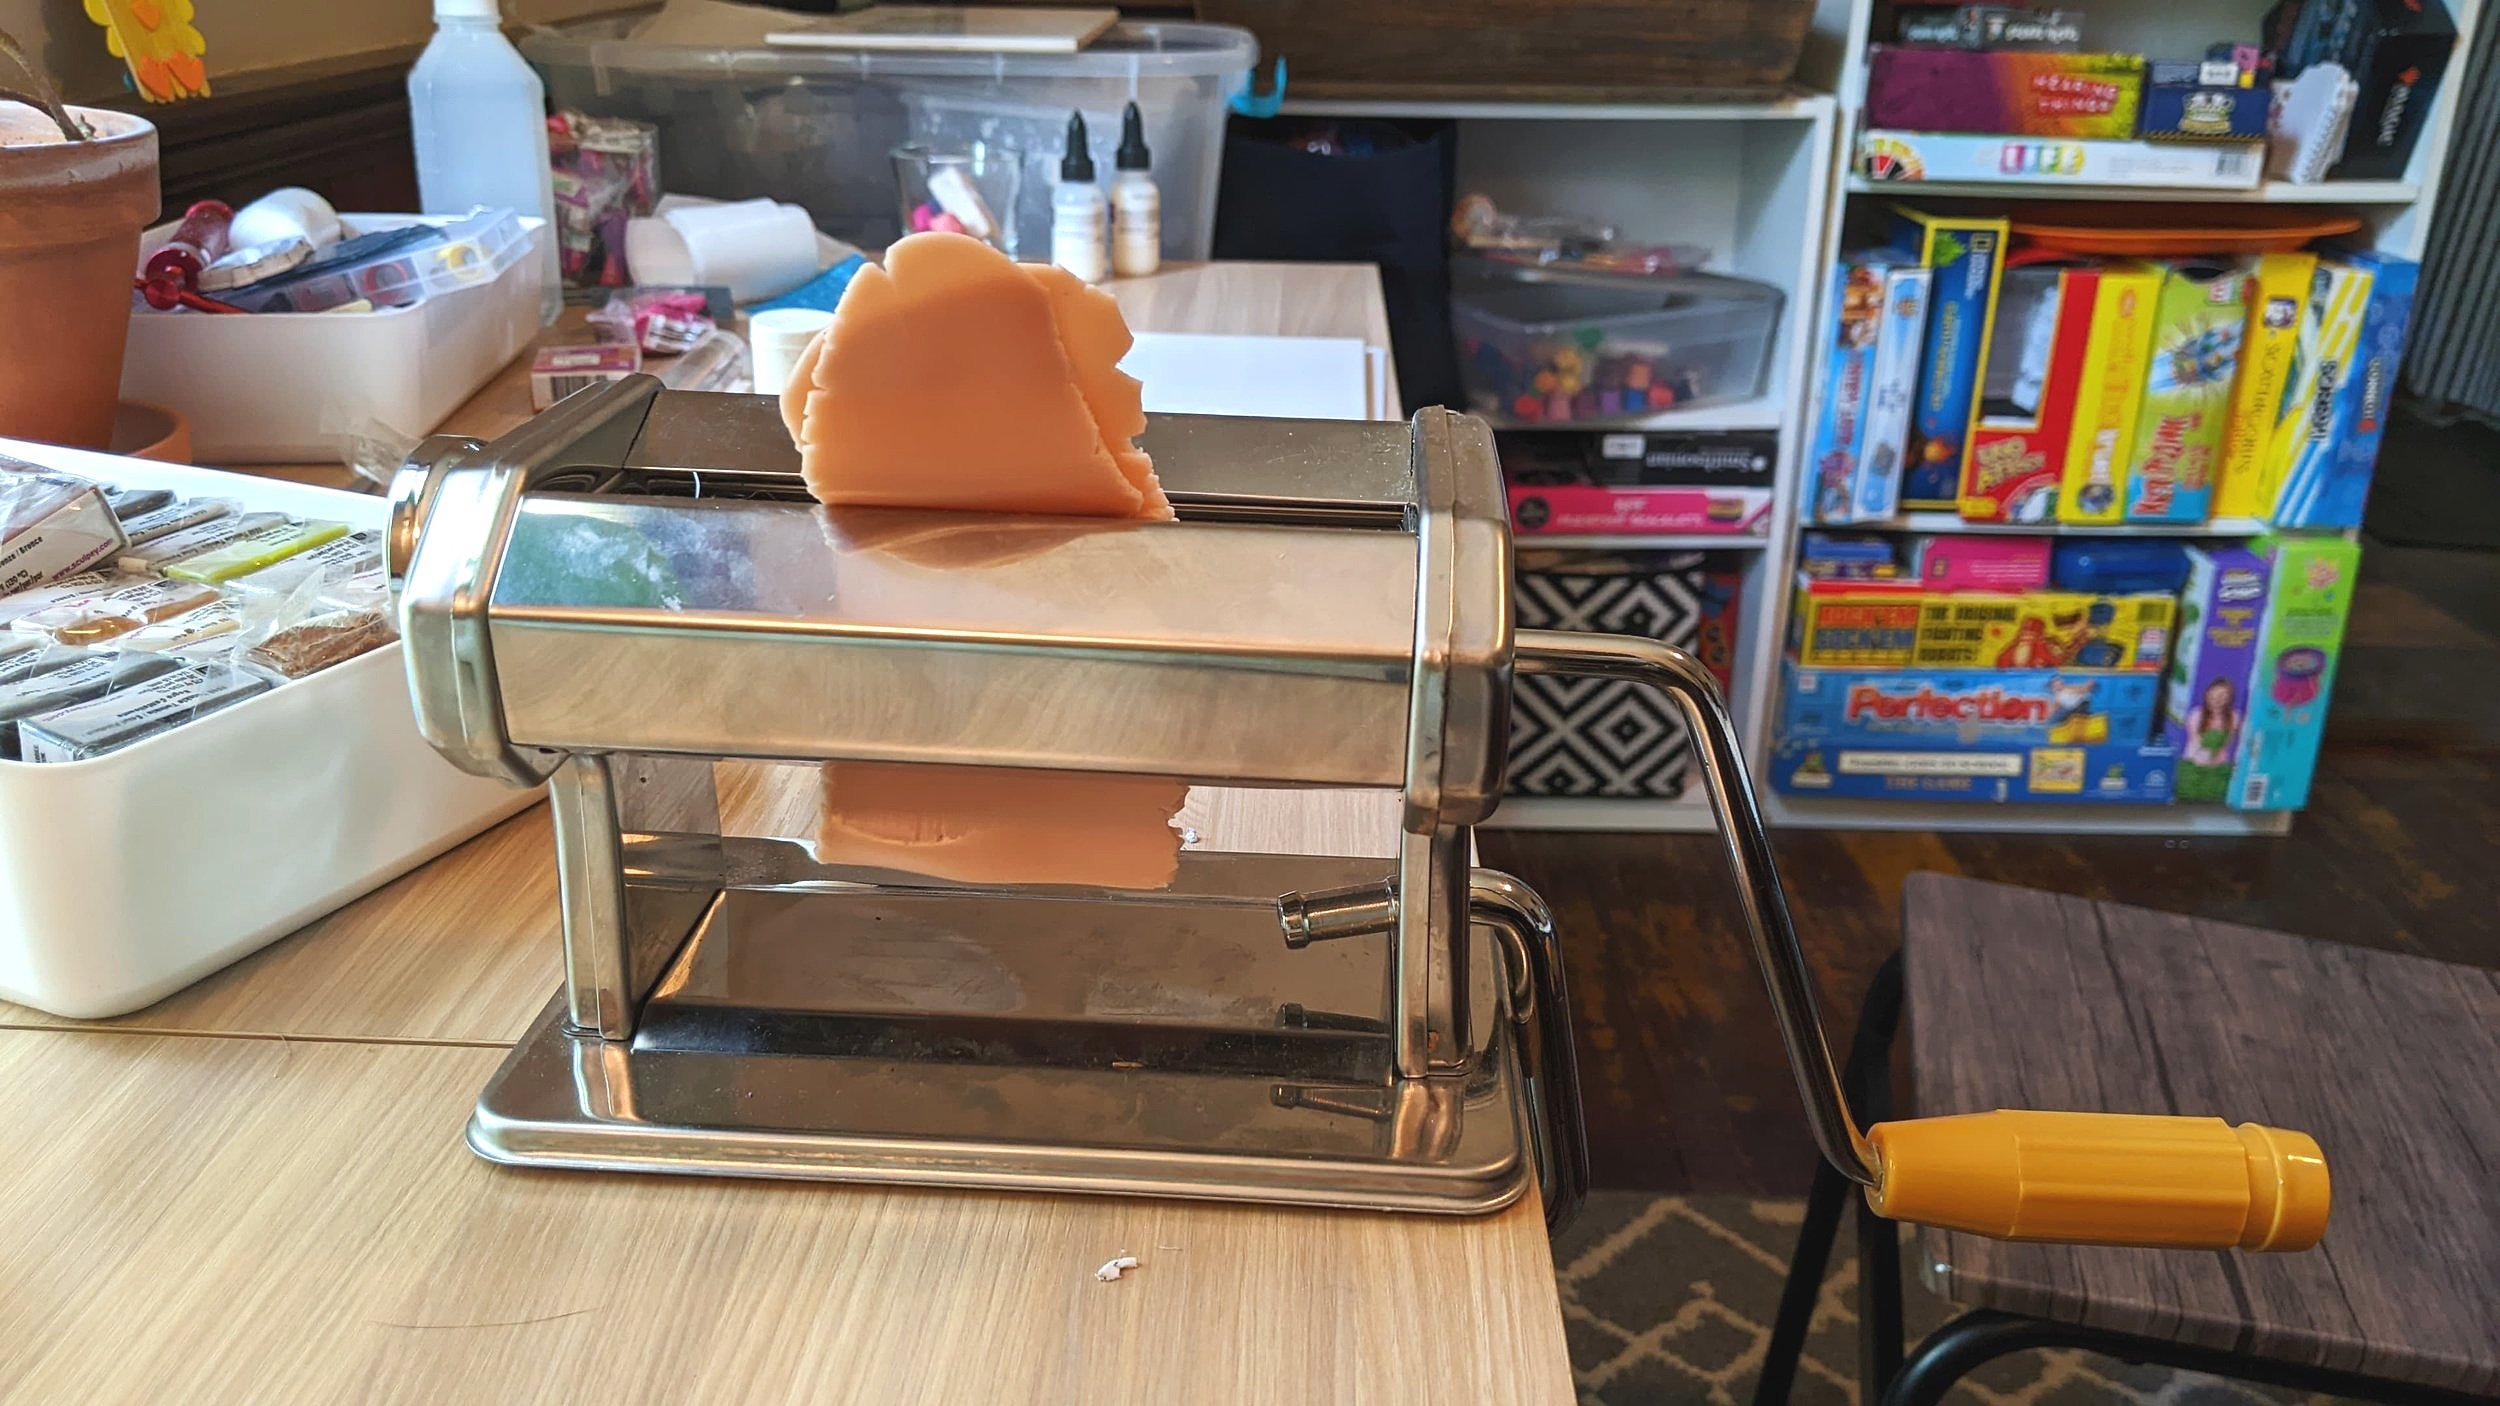
This is our pasta machine. We use it to roll out clay slabs to prep them for cutting. It’s a great tool to have handy but it is not required.
When working with polymer clay, it’s important to first condition it to get it ready to work with. This will soften it and ensure it’s all thoroughly mixed together. To condition, simply work the clay in your hands and manipulate it for a few minutes until it softens up. When it’s conditioned fully, we roll it through our pasta machine to get a nice, even layer. Tip: Wear gloves during the entire process to ensure there are no fingerprints left behind in the clay. It can be a problem when the clay is super soft. An important thing to note when using a pasta machine is to insert the clay with the folded side in first because this way you’re not trapping air bubbles in your clay. This becomes the base of our earrings. If you do not have a pasta machine, you can use popsicle sticks to create a buffer that will help keep the same thickness throughout the sheet. Just put the popsicle sticks to the sides of your clay and use your roller on top of them as a guide help keep your clay nice and even. We used two popsicle sticks for thickness before we bought our pasta machine.
Bring on the Colors
This step is not necessary and differs completely each project to work with our on the design. If we’re making just a solid color, we skip this part. If we’re making a marble pattern, this is where the fun begins…

Applying a thin layer of acrylic paint onto a slab of polymer clay with a silkscreen and a squeegee.
When making a marbled pattern we first chop up the base color clay into small cubes. After that we’ll add enough white paint to cover the cubes fully. To make sure our clay sticks together, we add in some liquid polymer clay which acts as an adhesive. If we are using gold flake, we’ll sprinkle that in now. After it’s all incorporated, we’ll press it together into a rectangular “slab.” We slice the clay brick we’ve created into slices about 1/4” thick and then layer them so they overlap slightly. Then we’ll take our acrylic roller and gently roll the clay so that it stays together when we stick it back into our pasta machine. This ensures it’s all nice and stuck together so we can move on to the next step. The results are absolutely gorgeous and it’s hard to believe they’re made out of clay.
Another really fun idea is silkscreens. They’re super easy to use. Just place down on your clay, roll gently. Apply a thin layer of acrylic paint and remove all excess. Remove the silkscreen and allow the paint to dry. Now you have a super cool design and it was very easy to do!
Time to Cut
This is arguably the most fun part of the process, but first here’s a quick tip- use a large tile as your work surface. Your clay will gently adhere to the tile and it’ll give you a cleaner cut. You can even use parchment paper on top of the tiles to make it easier to move to so you don’t have to touch it. Also, to make sure your clay doesn’t stick inside the cutter, dip the cutter in water before cutting. It won’t stick and you’ll save so much time. We wish we knew these things before we started… However, if you’re using a silkscreen with acrylic paint, do NOT dip the cutter in water or your design will get ruined. Instead, try taking a clean paintbrush after your paint is dry and add a layer of cornstarch to the top. It helps the cutters to not stick to the clay, but in our experience, the edges are less precise when we use this method. You can always just take a buffing tool and carefully fix the edges.

Here is our finished sheet right before cutting. We have applied a thin layer of cornstarch to this sheet already.
When your clay is nice and flat on your tile surface, using either the water or cornstarch method from above, you can start cutting your clay pieces. Try cutting them as close together as possible so you get the most out of your clay. You can reuse the clay until there’s none left if you just go back through the process to get back to this point.
Don’t throw away the tiny scraps though! There’s no wasting in this house. Save them until you have a decent amount and then mix them all together. You’ll be surprised what the color combination will make!
Remove Dust, Debris, and Fingerprints
After your pieces are cut out, it’s helpful to take cotton swabs and rubbing alcohol to remove any dust, debris, and fingerprints from the front of the earrings. You don’t have to do this, but it’s a good way to get a more flawless finish. To eliminate fingerprints, we like to wear gloves.
Bake Your Creations
When you’re satisfied with your work, align your small tiles on a baking sheet that you’ve dedicated to clay use only. This is where you will put your “ready-to-bake” clay pieces facedown. When you’ve got all your pieces aligned in a single layer, add another layer of small tiles to the back of the clay like a sandwich.(yum) This helps any trapped air bubbles shift to the back of the earrings where the weight of the tile helps release them during baking. Tip: Add a layer of parchment paper to the top and bottom of the clay pieces to prevent any shiny residue from the tiles when baking. If you can’t do this or forget this step, acetone works great after baking to remove the shine. Because of the parchment paper, the top tiles do tend to slide around so be careful when moving the baking sheet.
Follow the baking instructions on your clay to ensure they cure properly. Each clay brand has different instructions so be sure to double check before putting them in the oven.
Let Cool and Remove the Tiles
After you remove the clay pieces from the oven, be sure to let them cool. The tiles hold the heat and they will be very very hot. When they’re safe to touch, gently remove the tiles and reveal the baked pieces.
Dremel and Perfect
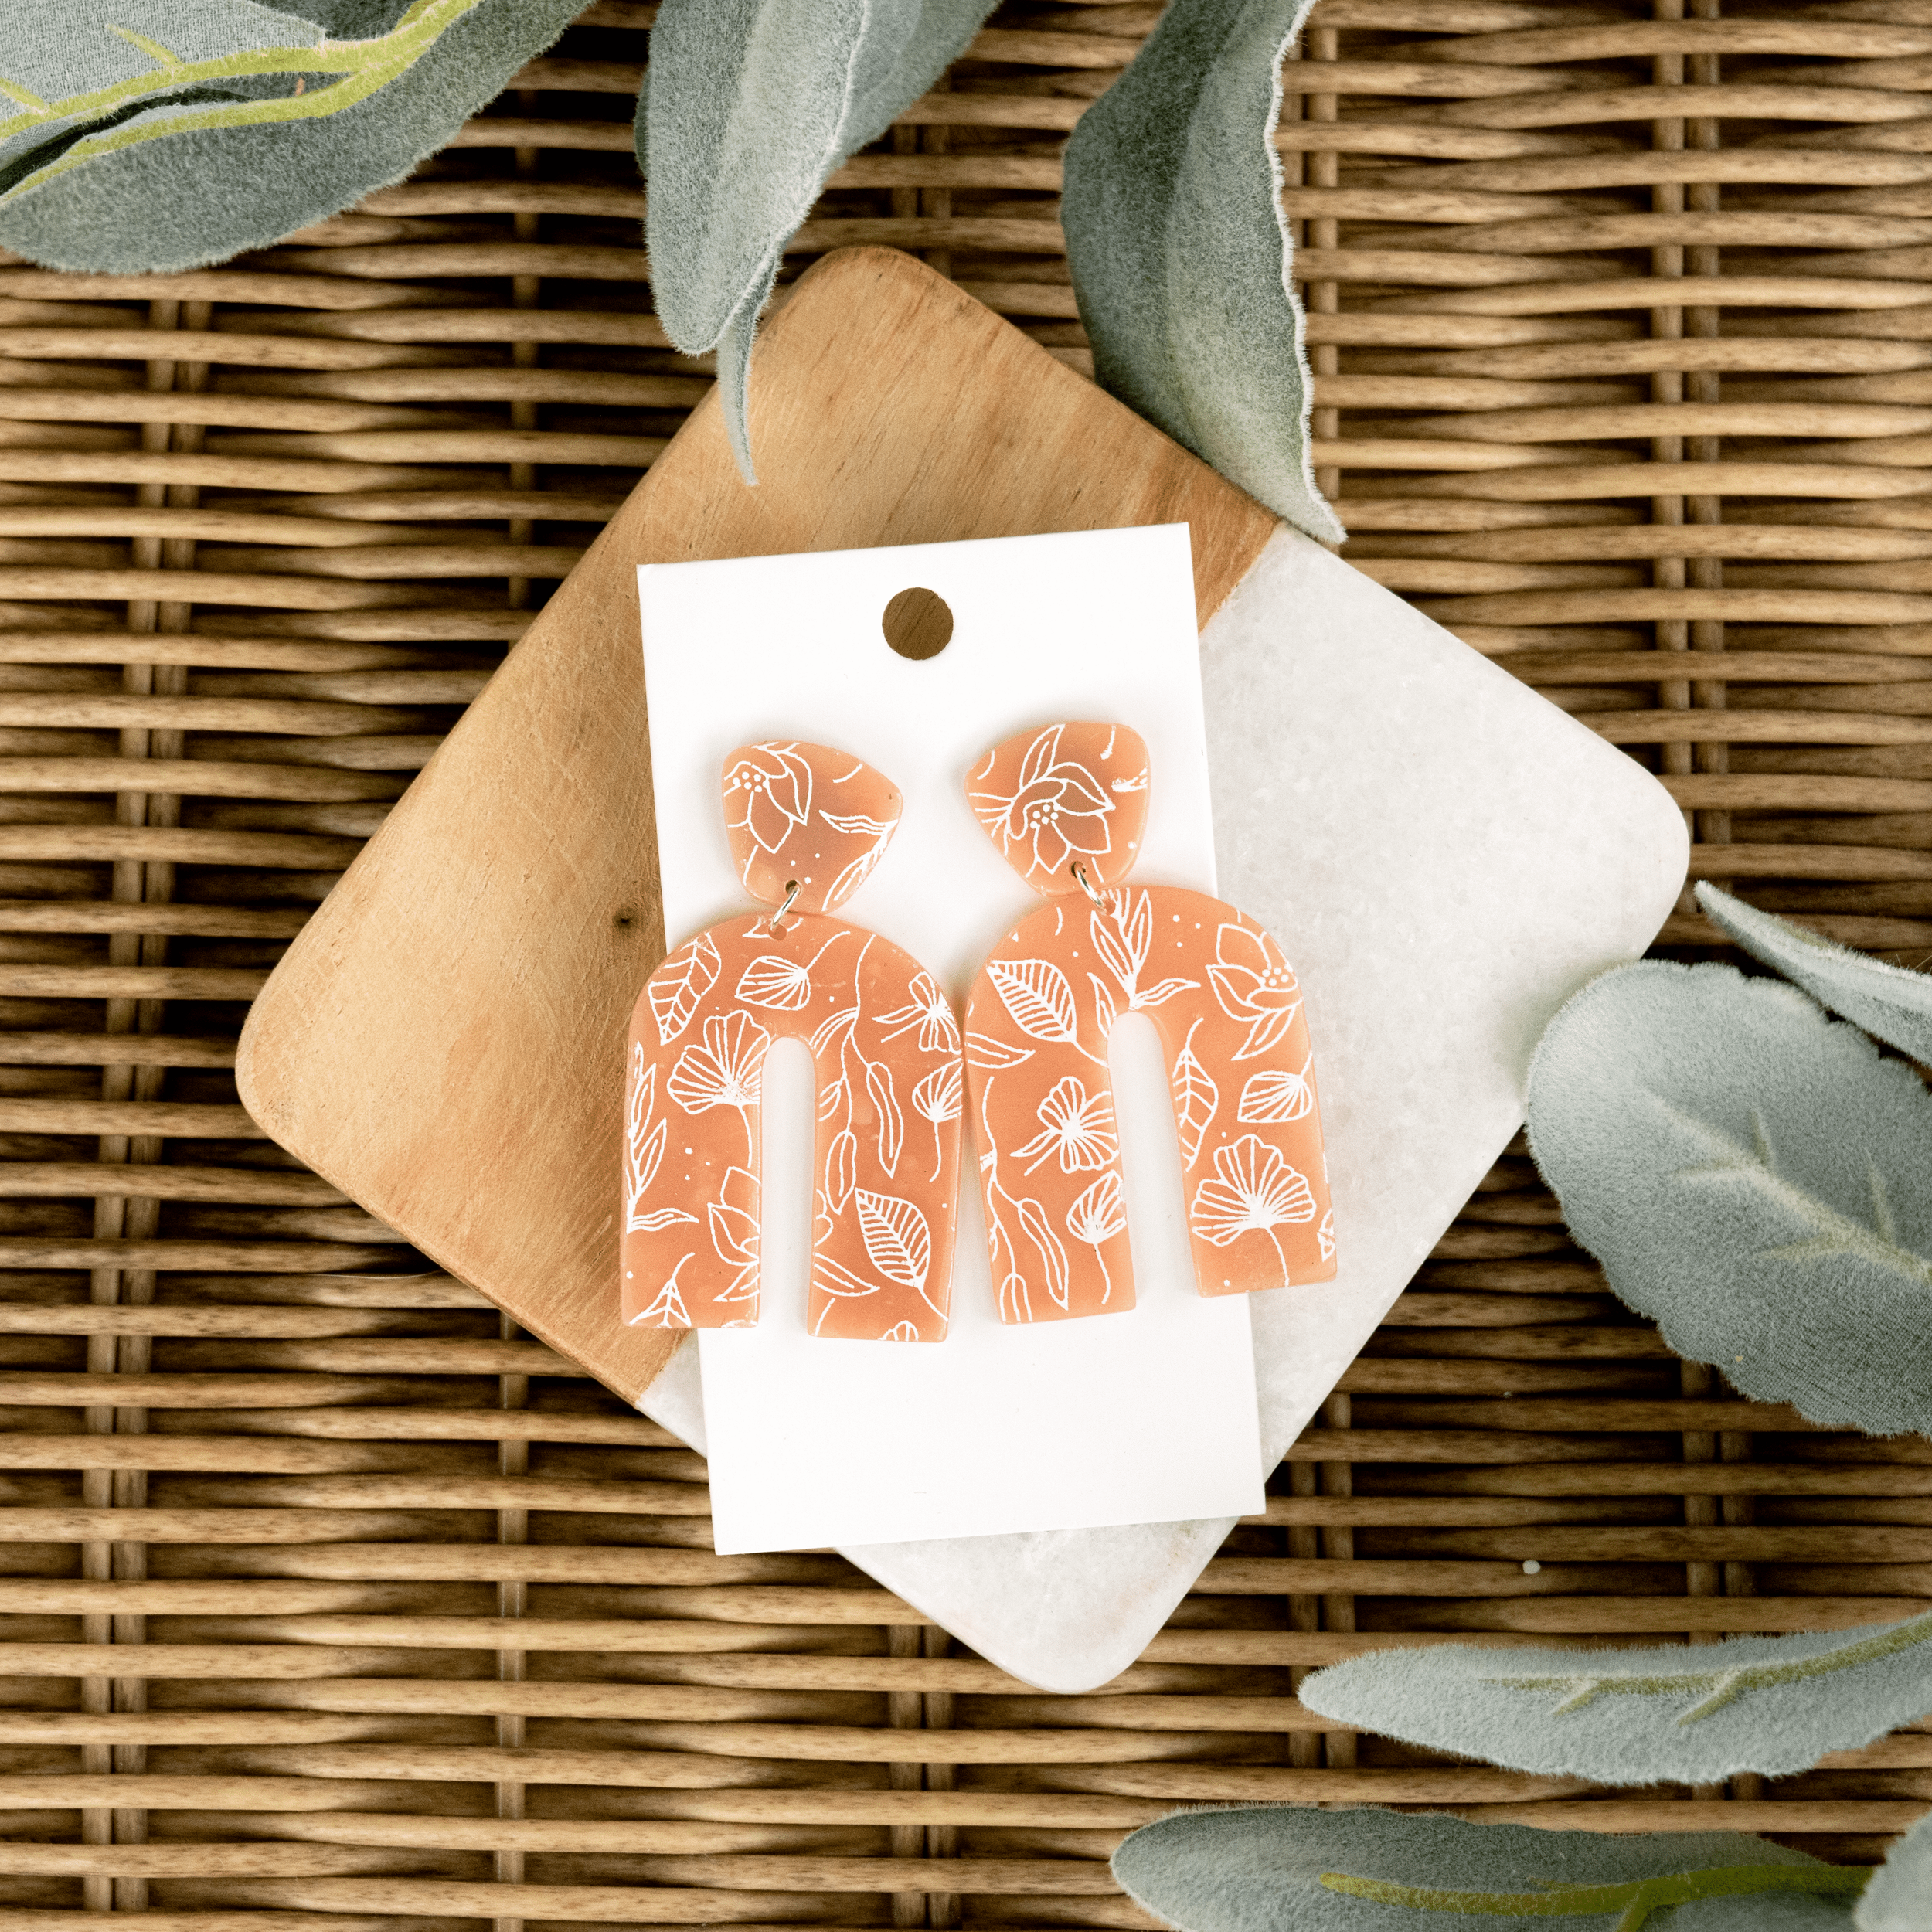
Our earrings have been completely assembled and are ready for their new homes.
The Dremel part is optional, but if you’re like us and desire super clean edges, you’ll likely need to sand them down at least a little to get them looking smoother and cleaner. We use a Dremel with a buffing attachment and it works perfectly. After you’re done perfecting your pieces, make sure to wash them off in water to remove all the excess dust. They are waterproof so nothing to worry about. Just dry them off with a soft cloth when you’re done.
Drill
When your clay pieces are dried off, it’s time to drill your holes. You’ll want to use a very small drill bit, but make sure it’s large enough to fit your hardware through. You can make a small dot with a pen to mark your center spot as a guide. Be very careful as polymer clay can be brittle. Make sure you drill close enough to the edge to fit a jump ring through but far enough that it won’t break apart when you drill it or attach hardware.
Finish and Seal
This step is also optional, but if you’re like us and love that shiny finish, you’ll want to use Polycrylic. It’s a water-based sealant that helps protect your earrings and gives them a beautiful shine. Just watching them go from dull to shiny is super satisfying.
Assemble Your Earrings
Allow the Polycrylic to dry for several hours to ensure they’re not tacky anymore. When they’re dried, you can fully assemble your earrings! We use a jewelry glue to adhere the earring posts to the top earring piece and jump rings to connect each piece together. Make sure to give the glue time to dry and they’re ready to wear! Be sure to use jewelry that is safe for ears and will not hurt those with sensitive ears.
Wear Your Earrings Proudly
If you made it this far (and even if you haven’t), we are so proud of you! You’ve made a pair of polymer clay earrings almost as perfect as you are! That’s a huge accomplishment and you should be so proud! Now when people compliment your earrings, you can say “Thanks, I made them myself!”
Whether you choose to make polymer clay earrings for yourself, as a gift for your friends, or to sell from your own small business, we hope you found our guide helpful. If you have any questions, feel free to leave them in the comments below and we’ll try to answer them as best as we can!
Also as a special thank you for reading this blog, take 10% off your next order with promo code: “BLOG10”!